
Move of the Month: Plank Series Fundamentals
Planks are often a go-to workout move integrated into many classes, from Pilates and yoga to HIIT and strength training. When people think of planks, they think of the classic elbow plank or high plank, but the reality is there are many variations to fit your needs and strengthen different areas of the body. In this article, we will explore the many plank variations and specific aspects of body alignment to get the most out of your planks.
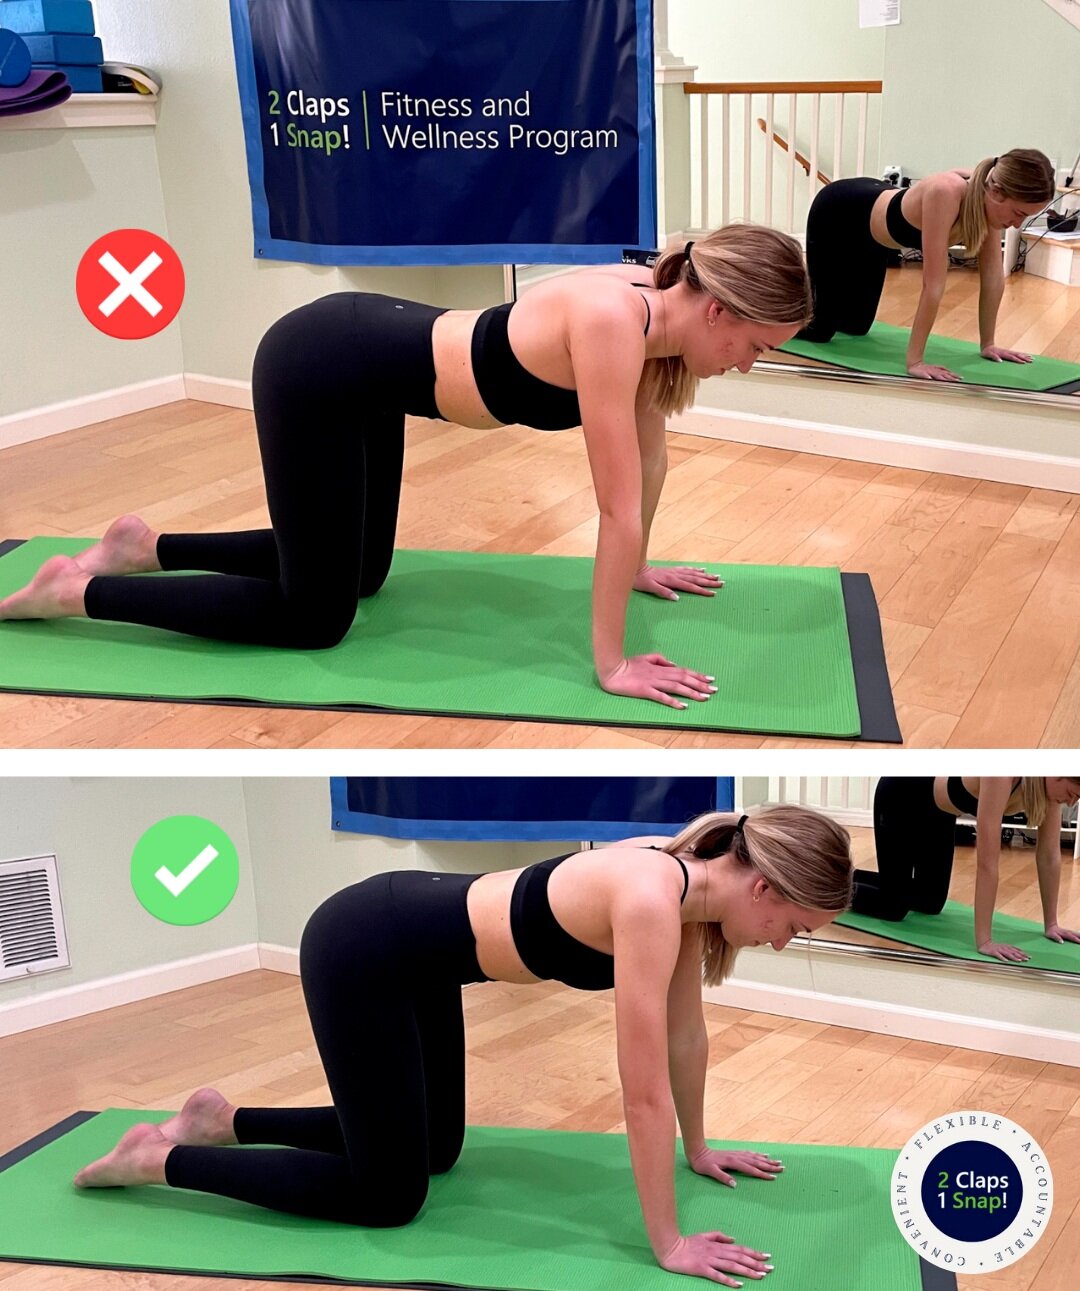
Starting with fundamentals, Tabletop Plank is the most basic version of a plank. This is a great position to begin with to focus on alignment and engaging the correct muscles. In Tabletop Plank, your pelvis, shoulders, and spine are in neutral alignment using core and stability muscles. Notice any valleys (sinking) or rounding between your shoulder blades—the body naturally goes into these positions because using the muscles in your shoulders and neck are easier on the body than engaging the core. If you notice rounding of the shoulders, lengthen the spine to find neutral—this causes engagement of the abdominal muscles. To help correct a valley between the shoulder blades and find neutral alignment, gently press forward with your hands to lift out of the shoulders using the serratus interior muscles. These problems are difficult to correct on your own because you are often unaware when you cannot see your body, so it’s important to have an instructor for more personalized feedback.

To align your neck and head, think about reaching the tips of your ears forward. Lengthen the back of the neck by lifting it up slightly, with the crown of the head pointed forward. Then relax your shoulders, jaw, and eyebrows.
There are other important alignment cues for the many variations of Kneeling Plank, High Plank, Elbow Plank, and Side Planks. In Kneeling Plank positions, the body naturally distributes its weight on the tops of the kneecaps, which can create some discomfort. Gently press your shins to the floor to engage your core and relieve the pressure in the knee, remembering to keep your head in line with your spine and relax and not round the shoulders.

For Non-Kneeling Planks, notice the alignment of your feet—are your ankles positioned behind the balls of your feet? Sinking into your heels during a plank makes the effort come more from the quads than the core; align your ankles over the balls of the feet, creating a line perpendicular to the floor to promote core engagement. Keep your legs strong and straight, and continue thinking about a neutral back, pelvis, and shoulder alignment.
In a High Plank, the position where you are on your hands rather than elbows, pay specific attention to your hands and wrists. Practice spreading your hands and fingers as wide as possible while flattening the entire hand (fingers and palm) to the floor. This may be difficult if you use a computer often—computer use can make the hands tight and prevent flattening onto the floor. Also, check the positioning of your hands under your shoulders, making sure your hands are shoulder width apart and stacked directly under your shoulders while pressing your hands to the floor with energy. If you have or encounter wrist issues in this position, you can try slightly turning out your hands or inching your arms further forward to lessen pressure on the wrists while still working on strengthening them.
However, if there’s still wrist pain try the Elbow Plank position. To position your elbows, first hold onto your elbows with the opposite hand to make sure your elbows are shoulder width apart, then bring your forearms out along the ground. Just like in a High Plank, we want to stack the joints, so check that your shoulders are lined up over your elbows.

Side Plank is slightly more difficult because your weight distribution is all balanced on one side. There are many things to focus on when in a Side Plank but of particular importance is keeping the top arm in line with the body. When the arm is released and too far behind the shoulder it causes the ribs to open and the back to arch. It’s equally important to keep from sinking into your supporting shoulder and press towards the crown of your head. To improve your side plank, focus on engaging the core, closing the ribs, and keeping the top arm in front of your body. Keeping your body strong and tight during any plank exercise will allow you to perform your best.
Now that you have learned some alignment and stability fundamentals, you can try out the various combinations of upper and lower body plank positioning—kneeling elbow plank, kneeling high plank, elbow plank, high plank, high side plank, kneeling high side plank, kneeling elbow side plank, and elbow side plank—to see which planks work the best for your fitness goals and body’s needs.
Want to learn more? Follow 2 Claps 1 Snap on Instagram for our Wellness Wednesday Series, where we provide weekly exercise and health tips and videos.